IT
2023.10.25
 2025.04.16
【入門】jQueryでカレンダーを作る方法 パート2


前回の記事はこちらです。まだ見ていない人はこちらから見るのをお勧めします。

【入門】jQueryでカレンダーを作る方法 パート1
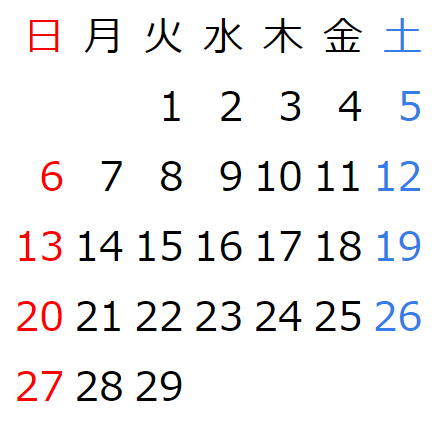
完成形
今回の記事で出来上がるカレンダーは以下の通りです。

前回のコード
前回のコードはこちらです。
$(document).ready(function () {

    //作成したいカレンダーの年月を入れる
    const year = 2000
    const month = 2


    $(".calendar").html(CreateCalendar(year,month))
});
function CreateCalendar(year,month){
    const weeks = ['日', '月', '火', '水', '木', '金', '土']
    //取得する月の1日の情報
    const startDateOfMonth = new Date(year, month - 1, 1)
    //取得する月の最終日の情報
    const lastDateOfMonth = new Date(year, month, 0)
    //1日の曜日
    const startDay = startDateOfMonth.getDay()
    //取得する月のカレンダーの行数
    const Calendarline = CalendarLine(startDay,lastDateOfMonth.getDate())
    var CalendarElement = "<table>"
    //カレンダーの曜日の行を作成
    CalendarElement += "<tr>"
    for (let w = 0; w < 7; w++) {
        CalendarElement += "<td>" + weeks[w] + "</td>"
    }
    CalendarElement += "</tr>"
    var currentDate = 1;
    for (let line = 0; line < Calendarline;line++){
        CalendarElement += "<tr>"
        for (let w = 0; w < 7; w++){
            //カレンダーの一行目の場合は1日の曜日より前の枠は空欄にする
            //最終日を超えた場合の枠も空欄にする
            if ((line == 0 && w < startDay)){
                CalendarElement += "<td></td>"

            }
            else if (currentDate > lastDateOfMonth.getDate()){
                CalendarElement += "<td></td>"
                currentDate++
            }
            else{
                CalendarElement += "<td>"+currentDate+"</td>"
                currentDate++
            }

        }
        CalendarElement += "</tr>"
    }
    return CalendarElement
}
// //1日の曜日とその月の日数を引数にしてその月の行を返す関数
function CalendarLine(startDay,lastDateOfMonth){
    //(例)1日が(金)で最終日が31日の場合6行になる。→31日(日)
    if (startDay + lastDateOfMonth >= 36){
        return 6;
    }
    //うるう年でない2月の1日が日曜日の場合
    else if (startDay + lastDateOfMonth <= 28){
        return 4
    }
    //それ以外はすべて5行
    else {
        return 5
    }
}
ここからcssを適用させる準備をしていきます。
変更するところ
変更するところは最後にカレンダーの要素を追加していくところです。
下のコードの5行目と23行目に注目してください。 var CalendarElement = "<table>"
//カレンダーの曜日の行を作成
CalendarElement += "<tr>"
for (let w = 0; w < 7; w++) {
CalendarElement += "<td class = w"+ w +">" + weeks[w] + "</td>"
}
CalendarElement += "</tr>"
var currentDate = 1;
for (let line = 0; line < Calendarline;line++){
CalendarElement += "<tr>"
for (let w = 0; w < 7; w++){
//カレンダーの一行目の場合は1日の曜日より前の枠は空欄にする
//最終日を超えた場合の枠も空欄にする
if ((line == 0 && w < startDay)){
CalendarElement += "<td></td>"
}
else if (currentDate > lastDateOfMonth.getDate()){
CalendarElement += "<td></td>"
currentDate++
}
else{
CalendarElement += "<td class = w"+ w +">" + currentDate+"</td>"
currentDate++
}
}
CalendarElement += "</tr>"
}
tdタグで要素を作っていますがその際にclassを追加しています。
今回は日曜日からw0、w1、w2...w6というclass名でtdタグに追加しています。これによって曜日ごとにclassが適用されるので装飾がしやすくなります。cssファイルを準備する
最後にcssファイルで装飾しましょう。日曜日(w0)と土曜日(w6)にそれぞれcolorを適用させます。
色は好みでいいと思います。また、せっかくなのでカレンダーの文字を右揃えにもしましょう。以下がcssのコードになります。.calendar{
text-align: right;
}
.w0{
color: red;
}
.w6{
color: rgb(55, 125, 231);
}
これで完成です。


【入門】jQueryでカレンダーを作る方法 パート3


 目次
目次


 タグ
タグ
 カテゴリ
カテゴリ
 アーカイブ
アーカイブ
 サイト内検索